
Salads
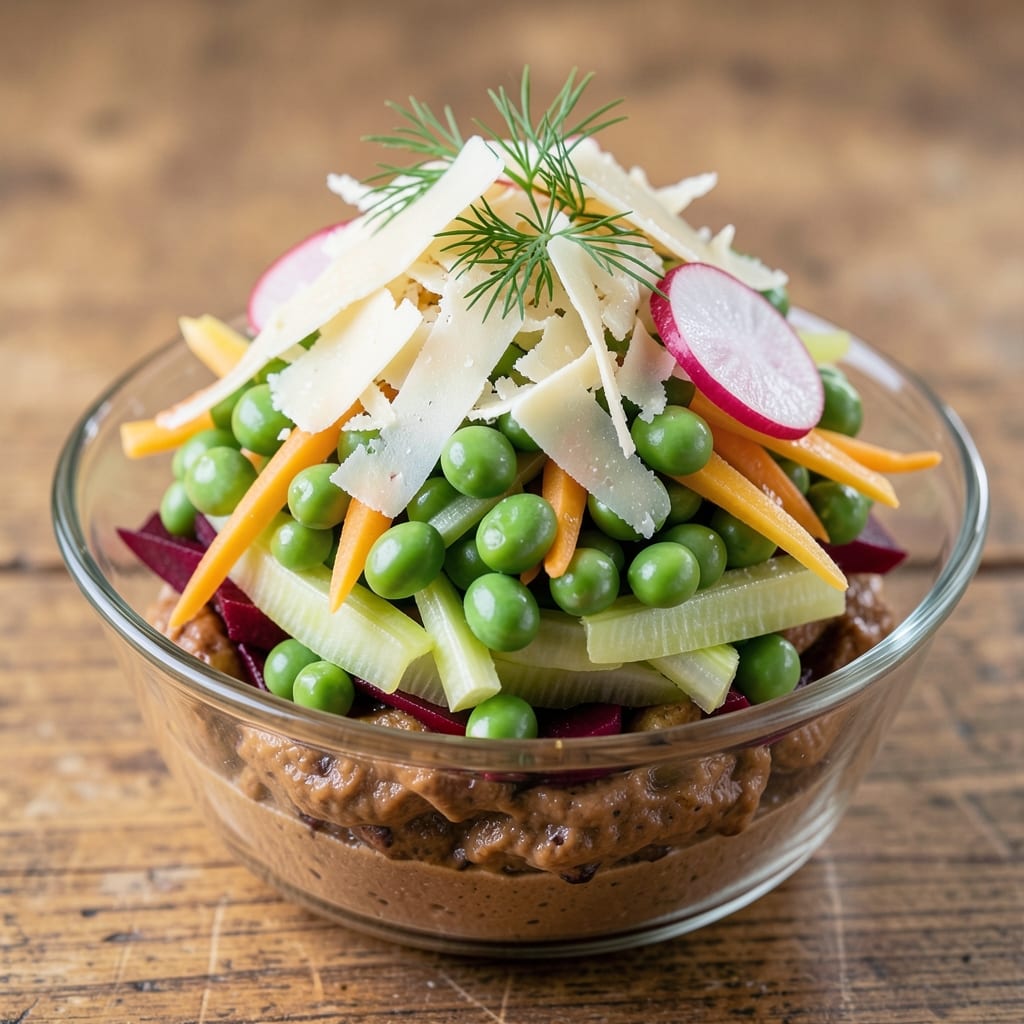
This 7-layer green pea salad recipe delivers the perfect balance of textures and flavors—creamy, crunchy, and satisfying in every bite. 💛 The secret lies in building each layer carefully, from tender boiled peas to crisp celery and rich parmesan, creating a dish that’s as impressive to serve as it is delicious to eat. Whether you're prepping for a picnic or a holiday spread, this salad holds its shape beautifully and tastes even better after chilling.
The assembly process is straightforward but requires patience—each ingredient must be cooked and cooled to the right temperature before layering. Start with the sturdiest components like potatoes and carrots, then add the peas, beets, and finally the creamy dressing mixture. The key to success is letting the salad rest in the fridge for at least 4 hours, allowing the flavors to meld and the layers to set perfectly. This isn’t just a side dish; it’s a centerpiece.
What makes this recipe truly special is the creamy parmesan dressing, which binds everything together without overpowering the fresh vegetables. You can customize it with vegan mayo or Greek yogurt for dietary flexibility, but the classic version remains a crowd-pleaser. The result? A vibrant, layered salad that’s crisp on the outside, creamy in the middle, and packed with the bright, fresh flavors of spring and summer.
Serve this salad chilled, sliced into neat portions for easy serving, or let guests dig in with a fork. It’s the kind of dish that disappears quickly—so make sure to double the recipe if you’re feeding a crowd. The layers hold together beautifully, making it perfect for potlucks, buffets, or even a light lunch on its own.
Ingredients for 7 layer green pea salad
Pantry staples meet fresh produce for this showstopping layered salad—crunchy, creamy, and perfect for any occasion.
| Ingredient | Amount | Notes |
|---|---|---|
| Green Peas 🌱 | 1 ½ cups | Fresh or frozen, thawed if frozen |
| Red Potatoes 🥔 | 1 ½ lb | Small, waxy variety preferred |
| Carrots 🥕 | 1 ½ lb | Baby carrots or julienned strips |
| Red Beets 🧅 | 1 lb | Medium, peeled and sliced thin |
| Celery Stalks 🧅 | 3 whole | Fresh, crisp, and stringless |
| Parmesan Cheese 🧀 | 1 ½ cups | Freshly grated, fine texture |
| Mayonnaise 🥛 | 1 cup | Duck or vegan mayo for variation |
| Greek Yogurt 🥛 | ½ cup | Plain, full-fat preferred |
| Fresh Dill 🌿 | ¼ cup | Chopped, for freshness |
| Salt 🧂 | 1 ½ tsp | Kosher or sea salt |
| Black Pepper 🌶️ | ½ tsp | Freshly ground for best flavor |
| Lemon Juice 🍋 | 2 tbsp | Freshly squeezed |
| Olive Oil 🫒 | 2 tbsp | Extra-virgin for richness |
The potatoes and carrots are the salad's sturdy foundation—waxy red potatoes hold their shape best, while baby carrots or julienned strips add vibrant color. Whole Foods or Trader Joe's usually have pre-washed baby carrots, which save time. For beets, organic are best—they’re easier to peel and have a deeper flavor. Look for firm, unblemished beets at the grocery store, and peel them right before slicing to keep them crisp. Celery should be crisp with no brown spots—the outer stalks are fine if you trim the stringy parts.
No waxy potatoes? Yukon Golds work in a pinch, but they’ll break down faster. Swap carrots for jicama or radishes for a different crunch. Beets giving you trouble? Roasted red peppers from a jar add sweetness without the fuss. The dressing is where you can get creative—Greek yogurt adds tang, while duck mayo brings richness. Fresh dill is ideal, but dried dill at half the amount works if you’re in a bind. The lemon juice and olive oil keep the dressing bright, so don’t skip them—they’re the secret to that fresh, vibrant flavor.
This salad tastes even better after chilling, so plan ahead. Store each layer separately in the fridge until assembly to keep everything crisp. The dressing can be made a day ahead—just stir before using. Once assembled, it keeps for 3-4 days in the fridge, though the layers may soften slightly after day two. For serving, slice into neat rounds or let guests dig in with a fork—it’s that good. Double the recipe if you’re feeding a crowd; the layers hold up beautifully.
Why You'll Love This Recipe
- No Boil, No Fuss: I swear by this trick—just boil the red potatoes and beets together in one pot, then cool them in ice water. That’s it. No extra pans, no stress, and they come out perfectly tender every single time.
- Earthy Sweetness Bomb: Between the caramelized beets and the crisp snap of celery, this salad has layers of flavor that surprise you. The peas add that buttery sweetness, and honestly? It’s the kind of dish that makes you want to eat it straight from the bowl.
- Potluck Crowd Pleaser: Between us, this is the one dish I always bring to gatherings. It’s hearty enough to be a main, but light enough to feel like a treat—plus, the colors make it look fancy without the effort. Everyone asks for the recipe.
- Fridge Hero: I make a double batch on Sundays, and it lasts me all week. The potatoes stay firm, the beets hold their color, and the dressing keeps it fresh. It’s my go-to for lazy lunches, sandwich fillings, or even a quick pasta topping.
Step-by-step instructions for 7 layer green pea salad
This layered salad builds flavor and texture with each step—think crispy potatoes, sweet beets, and that perfect creamy finish.
🍳 Step 1: Cook and Chill All Vegetables
Start by boiling the 1.5 lb red potatoes and 1.5 lb carrots in salted water for 12-15 minutes until fork-tender. Drain and rinse under cold water to stop cooking—this keeps them firm. While they cool, boil the 1 lb red beets for 20-25 minutes until soft, then cool them too. The 1.5 cups green peas go in last for just 3-4 minutes—they should stay bright green and tender-crisp.
Here's the thing—chilling is key. Spread all cooked veggies on a tray and refrigerate for at least 1 hour. This makes them easier to slice and prevents the salad from getting watery later. I like to do this while I prep the dressing—double duty!
🥘 Step 2: Slice and Layer the Base Ingredients
After chilling, slice the potatoes and carrots into ¼-inch thick rounds using a mandoline for even slices. Thinly slice the beets and celery stalks into ⅛-inch strips—the celery should be crisp, so cut it last. Arrange the potatoes in the bottom of your serving dish in a single layer, slightly overlapping like shingles. This creates your sturdy foundation.
Next comes the beets, then the carrots—each layer should be about ½-inch thick. I press down gently to compact them slightly. This prevents the layers from shifting when you add the creamy bits later. Save the peas for the top layer—they'll stay bright and add that signature pop of color.
👨🍳 Step 3: Make the Creamy Dressing
In a bowl, whisk together the 1 cup mayonnaise, 0.5 cup Greek yogurt, 2 tbsp lemon juice, 2 tbsp olive oil, 1.5 tsp salt, and 0.5 tsp black pepper. This is where the magic happens—don't skip the lemon juice, it brightens everything up. Add 0.25 cup chopped fresh dill and mix until fully combined. The dressing should be thick but spreadable, like a perfect mayo-yogurt hybrid.
Here's a pro tip: If the dressing seems too thick, add 1-2 tsp cold water to loosen it. You want it to coat the back of a spoon but still hold its shape. Taste and adjust seasoning—this is your chance to make it perfect before it gets layered.
🥘 Step 4: Layer the Creamy Components
Spread half of the dressing evenly over the vegetable layers. Then sprinkle ¾ cup of the 1.5 cups Parmesan cheese—this is your first creamy layer. Repeat with another layer of vegetables, then the remaining dressing and cheese. Finish with the 1.5 cups green peas scattered on top. The peas should peek through the cheese like little green jewels.
This is where the 7-layer magic happens. The cheese melts slightly into the dressing, creating that creamy texture we're after. Press down gently on the top layer to help everything settle. Cover and refrigerate for at least 4 hours—this lets the flavors meld and the layers set properly.
🍽️ Step 5: Serve and Enjoy the Crunch
When ready to serve, garnish with extra chopped fresh dill and a final sprinkle of Parmesan cheese. The contrast of crispy celery, tender potatoes, and creamy dressing is what makes this salad special. Cut into wedges or serve straight from the dish—either way, you'll get that satisfying crunch with every bite.
Real talk: This salad keeps well for 3-4 days in the fridge, but the first day is always the best. The flavors deepen as it sits, and the layers hold together perfectly. Perfect for potlucks, picnic lunches, or a fancy side dish that actually impresses.
Pro Tips For Making 7 Layer Green Pea Salad
- COOL THE POTATOES FAST: Drain red potatoes into ice water for 10 minutes after boiling—this stops cooking and makes them easier to slice evenly. I used to skip this and ended up with mushy layers; now they hold their shape perfectly.
- PEEL BEETS WHILE WARM: Boil beets until fork-tender, then peel them right out of the hot pot while they’re still warm. The skins slide off like magic, and you avoid that stubborn dried-on mess. (Yes, even if you’re impatient like me.)
- CHOP CELERY SMALLER THAN YOU THINK: Dice celery into ¼-inch pieces—smaller than you’d use for a crunchy salad. It blends better with the peas and prevents a clunky texture in the final layers. I learned this after three attempts with "too-crunchy" celery.
- LAYER DRY, NOT WET: Pat every ingredient completely dry before assembling—especially potatoes and beets. Wet layers blur the colors and make the salad soggy within hours. Use paper towels; it’s worth the extra minute.
Make-ahead tips for leftovers
Prep Ingredients Separately
Cook and chill each vegetable component individually before assembling. Boil the 1.5 lb red potatoes and 1.5 lb carrots together for 12-15 minutes, then cool under cold water. The 1 lb beets need 20-25 minutes of boiling and cooling separately. Save the 1.5 cups green peas for last—just 3-4 minutes of cooking to keep them vibrant. Spread everything on a tray and refrigerate for at least 1 hour before slicing. This prevents sogginess and makes layering easier. 💫
Dressing Prep Ahead
Make the creamy dressing 24 hours ahead and store it in an airtight container in the fridge. The flavors develop beautifully overnight, and it won’t separate if you whisk it thoroughly. I like to double the batch—it’s perfect for sandwiches or extra salad toppings. Just give it a quick stir before using to restore its smooth texture. The Greek yogurt adds tang, while the lemon juice keeps it bright and fresh.
Layering Strategy
Start with the sturdiest vegetables—potatoes and carrots—as your base. Slice them into ¼-inch rounds and arrange them in a single layer in your serving dish. Next, add the beets and celery, each about ½-inch thick. Press down gently to compact the layers before adding the creamy components. This prevents shifting when you add the dressing and cheese later. The peas go on top last—they’ll stay bright and add that signature pop of color. 🥗
Chilling Time Matters
After assembling all layers, cover your salad and refrigerate for at least 4 hours—overnight is ideal. This chilling time lets the flavors meld together and the layers set properly. The cheese will soften slightly, creating that creamy texture we love. Don’t skip this step! The salad will taste even better after chilling, with all the flavors harmonizing perfectly. Trust me, the wait is worth it.
Serving Suggestions
Slice the salad into neat wedges for easy serving, or let guests dig in with a fork. Garnish with extra chopped fresh dill and a sprinkle of Parmesan cheese right before serving. This salad holds up beautifully for 3-4 days in the fridge, making it perfect for meal prep. Double the recipe if you’re feeding a crowd—it’s a showstopper that disappears quickly. The layers stay intact, so you can serve it straight from the dish with confidence. ✨
Make-Ahead for Events
This salad is a lifesaver for potlucks and picnics. Assemble it completely the day before, cover tightly, and store in the fridge. The layers will hold together perfectly, and the flavors will deepen. Bring it in a large serving dish or cut into individual portions for easy transport. Just add a final garnish of dill and Parmesan before serving. It’s always a crowd-pleaser—guests will be impressed by how well it holds its shape and tastes even better the next day. 💛
Nutrition facts
Frequently asked questions
Can I make this salad ahead of time?
This salad tastes even better after chilling. Assemble it completely, cover tightly, and refrigerate for at least 4 hours (overnight is ideal). The layers will hold perfectly, and the flavors meld beautifully. It keeps well for 3-4 days in the fridge—just add fresh dill and Parmesan before serving.
What if I don't have Parmesan cheese?
No problem! Swap it for Pecorino Romano or Asiago cheese for a similar sharp, salty flavor. For a dairy-free option, use nutritional yeast or extra Greek yogurt mixed with lemon zest. The key is a salty, umami element to balance the sweet vegetables.
How do I keep the layers from getting soggy?
Prevent sogginess by chilling all cooked vegetables for at least 1 hour before layering. Use a mandoline for even slices, and press layers gently as you build. The dressing should be thick but spreadable—add 1-2 tsp cold water if needed. Avoid over-mixing the peas to keep them bright and crisp.
Can I make this salad vegan?
Yes! Use vegan mayo and dairy-free Greek yogurt for the dressing. Replace Parmesan with vegan Parmesan or extra cashew cream. The texture will be slightly different but still delicious. The lemon juice and olive oil keep it bright and flavorful.
What’s the best way to serve this salad?
Slice into neat wedges for easy serving or let guests dig in with a fork. Garnish with extra dill and Parmesan right before serving. It pairs perfectly with grilled meats, sandwiches, or as a light main dish. For picnics, pack individual portions in airtight containers to keep layers intact.