
Side Dishes
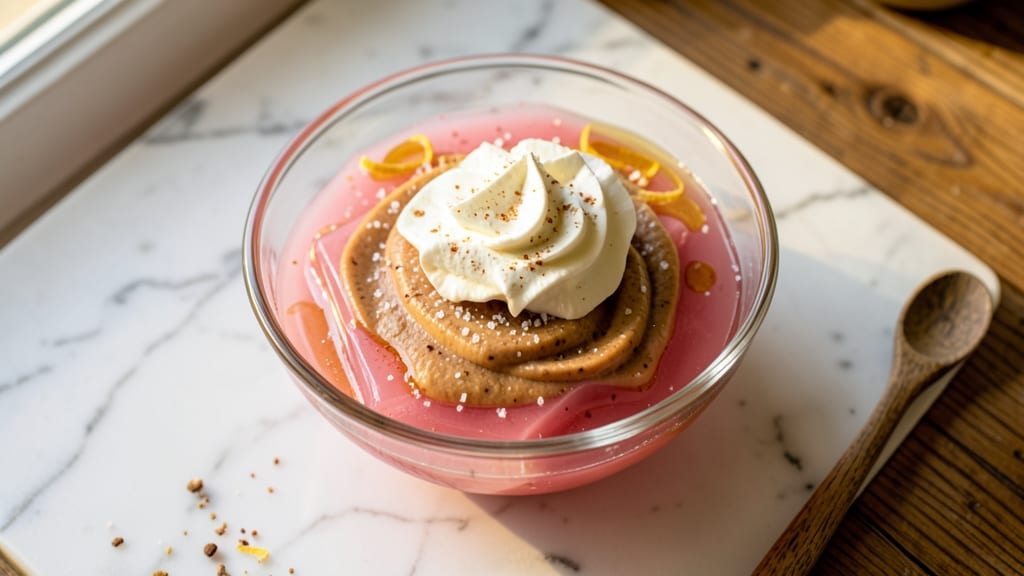
This applesauce jello salad recipe brings back the comforting textures of childhood—creamy whipped topping swirled with tangy gelatin and sweet applesauce. The layers create a nostalgic dessert that’s surprisingly easy to assemble with just a few pantry staples. I remember making this for summer potlucks, and it always disappeared first.
The secret to perfect texture lies in the chilling time—at least 4 hours ensures the gelatin sets firm while the whipped topping stays light and fluffy. You’ll need unflavored gelatin, applesauce, and vanilla whipped topping, plus optional cake crumbs or fruit for extra crunch.
This recipe delivers that signature creamy contrast between the gelatin and whipped layers.
Once set, the salad transforms into a vibrant, creamy dessert with swirls of pink gelatin and white whipped topping. The applesauce adds natural sweetness, while the optional cake crumbs or fruit pieces give every bite a satisfying texture.
It’s the kind of dish that feels indulgent but comes together in under 15 minutes of prep.
Perfect for picnics, potlucks, or a quick dessert when company drops by. The best part? It tastes even better the next day. Let’s get started with this classic recipe that’s easier than it looks.
Ingredients for applesauce jello salad
Just eight ingredients transform into that nostalgic, creamy dessert you loved as a kid.
| Ingredient | Amount | Notes |
|---|---|---|
| Unflavored Gelatin 🍓 | 2 tbsp | Bloomed in cold water first |
| Pink Gelatin Powder 💖 | 1 package | Small 3-oz box (about 1/3 cup) |
| Applesauce 🍎 | 1 cup | Unsweetened, smooth texture |
| Vanilla Whipped Topping 🍦 | 1 cup | Store-bought or homemade |
| Granulated Sugar 🍬 | ¼ cup | For extra sweetness |
| Vanilla Extract 🌿 | 1 tsp | Pure, high-quality |
| Cake Crumbs 🍰 | ½ cup | Vanilla or pound cake crumbs |
| Maraschino Cherries 🍒 | ¼ cup | Chopped, optional garnish |
| Hot Water 💧 | 1 cup | For blooming gelatin |
| Heavy Whipping Cream 🥛 | ½ cup | For homemade whipped topping |
| Powdered Sugar 🍬 | ¼ cup | For whipped topping sweetness |
| Salt 🧂 | ¼ tsp | Pinch for whipped cream |
The gelatin is the star here—Knox brand is my go-to because it blooms perfectly. Grab a small box of pink gelatin powder (about 1/3 cup) from the baking aisle, not the dessert section. For the cake crumbs, I always use vanilla pound cake from a homemade batch—the flavor is richer than store-bought. If you're making this from scratch, toast your cake crumbs lightly in a dry pan for extra crunch. The whipped topping can be store-bought for convenience, but homemade with heavy cream and powdered sugar is worth the extra five minutes.
No gelatin powder? Unflavored gelatin plus pink food coloring works in a pinch. Short on cake crumbs? Crushed vanilla wafers or graham crackers add a similar crunch. The applesauce should be unsweetened—Mott's or Libby's are my favorites, but any smooth kind works. For extra flavor, add a splash of lemon juice to the gelatin mix. If you're feeling fancy, fold in a few chopped maraschino cherries for pops of color and sweetness. The whipped topping can be vanilla or butterscotch—whatever you prefer!
This dessert needs at least 4 hours to set properly, so plan ahead. Once chilled, it keeps beautifully in the fridge for 3-4 days—if it lasts that long! For serving, run a knife around the edges to loosen it from the dish. The texture is best at room temperature, so let it sit for 10 minutes before slicing. Leftovers? It reheats surprisingly well—just microwave for 20 seconds to soften the gelatin slightly. Trust me, it's even better the next day!
Why You'll Love This Recipe
- No-Fuss Assembly: I swear, this takes less time than debating what to eat for dinner. Just bloom the gelatin in cold applesauce—no boiling, no waiting for hours—then fold in the whipped topping. The pink gelatin layers in like magic, and honestly? You’ll have a bowl ready before the kids even finish complaining about dinner.
- Sweet-Tart Magic: That first bite—creamy applesauce cutting through the jelly-like gelatin? It’s like dessert sneaking into your main dish. The vanilla whipped topping adds a cloud of sweetness, but the sugar in the applesauce keeps it from being cloying. (Yes, even my picky husband asks for seconds.)
- Potluck Hero: Between us, this is my go-to for church gatherings or family BBQs. It’s cold, it’s colorful, and it doesn’t wilt in the heat. Plus, the gelatin keeps it from getting soggy—unlike those sad, watery salads that show up at every picnic. People always clear their plates first.
- Pantry Staple Power: I make a double batch and keep it in the fridge for weeks. The gelatin actually improves over time—more set, less messy. And with just sugar, applesauce, and store-bought whipped topping, it’s cheaper than takeout. (My wallet thanks me every time.)
Step-by-step instructions for applesauce jello salad
Let's create this nostalgic dessert with perfect layers and creamy texture.
Bloom the Gelatin Properly
In a small bowl, sprinkle the 2 tablespoons unflavored gelatin over the 1 cup hot water—don't pour the water over the gelatin or it won't bloom properly. Let it sit for 5 minutes, stirring once halfway through. You'll see the gelatin granules soften and expand as they absorb the liquid. This step is crucial because under-bloomed gelatin won't set properly, while over-blooming can make the texture gummy.
While waiting, measure out the 1 cup applesauce and ½ cup cake crumbs in separate bowls. The applesauce should be smooth and unsweetened—this prevents the dessert from becoming too syrupy. Keep these ready as we'll need them shortly.
Prepare the Pink Gelatin Layer
In a medium mixing bowl, combine the bloomed gelatin mixture with the 1 package pink gelatin powder. Stir until completely dissolved—this should take about 2 minutes of gentle mixing. The mixture will thicken noticeably as it cools slightly. Add the ¼ cup granulated sugar and 1 teaspoon vanilla extract, stirring until fully incorporated.
Next, fold in the ½ cup cake crumbs using a rubber spatula. Be gentle to avoid breaking up the crumbs too much—you want them to remain distinct for that classic crunch. The texture should be thick but spreadable, like a thick pudding. This layer will form the base of your salad, so take your time to get it smooth.
Create the Creamy Vanilla Layer
In a separate bowl, whip together the ½ cup heavy whipping cream, ¼ cup powdered sugar, and ¼ teaspoon salt until stiff peaks form. This should take about 3-4 minutes with an electric mixer. The cream should hold its shape when the beaters are lifted—if it's too runny, whip for another minute. Add the 1 cup vanilla whipped topping and gently fold it into the whipped cream until fully combined.
This layer is what gives the salad its signature creamy texture. The whipped cream should be light and airy, not dense. If you're using store-bought whipped topping, make sure it's fully chilled before combining to maintain stability.
Assemble the Layers in the Mold
Pour half of the pink gelatin mixture into a 9x13-inch baking dish or equivalent serving dish. Using the back of a spoon, spread it evenly across the bottom. Then, carefully spoon half of the vanilla cream mixture on top, spreading it smoothly. The layers should be about equal in thickness—this ensures balanced texture and flavor in every bite.
Repeat with the remaining gelatin mixture and vanilla cream, creating a second layer. For a marbled effect, gently swirl the two layers together with a knife or spoon. This step is where the magic happens—the contrast between the pink gelatin and creamy vanilla creates that iconic look.
Chill Until Firmly Set
Cover the dish tightly with plastic wrap and refrigerate for at least 4 hours, preferably overnight. The longer it chills, the firmer the gelatin will become. You'll know it's ready when the edges pull away cleanly from the dish and the center has a slight jiggle but holds its shape when shaken gently.
Before serving, run a warm knife around the edges to loosen the salad, then invert it onto a serving plate. Garnish with the chopped ¼ cup maraschino cherries for a pop of color and sweet-tart contrast. This dessert is best served slightly chilled—it melts beautifully in your mouth, delivering that perfect balance of creamy, crunchy, and fruity flavors.
Pro Tips For Making Applesauce Jello Salad
- Bloom the Gelatin Right: I used to just toss the unflavored gelatin into the hot liquid and stir—until I realized it clumped like lumpy glue. Instead, sprinkle it over ¼ cup cold water first, let it sit for 5 minutes until it looks like puffy petals, then whisk it into the warm applesauce mixture. That’s the thing that actually prevents graininess.
- Use Warm Applesauce: Cold applesauce straight from the jar? Nope. Heat it gently (just until steaming) before mixing with the gelatin—this helps the gelatin dissolve completely and keeps the final texture silky. I learned this the hard way after serving a batch that had little speckles of undissolved powder. (Yes, even if you’re impatient like me.)
- Skip the Extra Sugar: The recipe might call for sugar, but applesauce is already sweet enough. If you add too much, you’ll end up with a dessert that tastes like candy instead of that nostalgic, slightly tangy jello salad flavor. Taste as you go—you might not need any at all.
- Fold in Whipped Topping Last: Add the vanilla whipped topping too early, and it’ll melt into the warm gelatin mixture. Instead, wait until the entire jello layer is set (about 2 hours in the fridge), then spoon the whipped topping on top and gently swirl it in with a knife. This keeps those pretty marbled layers without turning the topping into a sad, soupy mess.
Regional styles of applesauce jello salad
Southern Potluck Classic
This version is the one I grew up with at church potlucks and family reunions in the South. The key difference is adding ½ cup crushed vanilla wafers to the gelatin layer instead of cake crumbs, plus a splash of 1 teaspoon lemon juice in the applesauce.
The lemon brightens the flavor, and the wafers add that signature crunch without needing to bake anything extra. I always garnish with chopped pecans for a Southern twist that feels extra special. 🍎
Midwest Picnic Favorite
In the Midwest, this dessert often gets a graham cracker crumb topping—about ½ cup—mixed into the gelatin layer for a nuttier flavor profile. They also commonly add ½ cup diced apples (like Granny Smith) to the whipped cream layer for extra texture.
The Midwest version tends to be slightly less sweet, so I reduce the sugar to 3 tablespoons instead of ¼ cup. This keeps the dessert refreshing for summer picnics. 🥧
New England Layered Twist
Up north, they take the classic recipe and add a thin layer of lemon curd between the gelatin and whipped cream. This creates a tangy contrast that balances the sweetness perfectly.
I use ½ cup store-bought lemon curd (like Bonne Maman) or make a quick version with egg yolks, sugar, and lemon juice. The New England style also calls for chopped candied ginger as a garnish, adding a spicy-sweet element that’s unexpected but delicious. 🍋
Modern Vegan Adaptation
For a plant-based version, swap the gelatin for agar-agar powder (about 1½ teaspoons) and use coconut milk whipped cream instead of dairy. The texture will be firmer but still creamy. I fold in ½ cup vegan vanilla pudding (like Silk brand) to replace the whipped topping layer.
This version keeps the same nostalgic vibe but works for dietary restrictions. Garnish with fresh berries for color and natural sweetness. 🌱
Tropical Vacation Version
Bring the flavors of a beach vacation to your dessert by adding ½ cup crushed pineapple (drained well) to the gelatin layer and swirling in ½ cup coconut whipped cream on top. Use orange gelatin instead of pink for a sunny hue, and garnish with toasted coconut flakes.
This version is lighter and perfect for summer gatherings or themed parties. The pineapple adds a tropical twist that’s both refreshing and fun. 🥥
Classic Cake Layer Option
For a showstopper, layer this between two thin sheets of vanilla sponge cake (like a pound cake). After assembling the gelatin and whipped cream layers, place a chilled cake layer on the bottom of your dish, then top with the salad mixture, and finish with another cake layer.
This creates a stunning presentation that’s perfect for special occasions. The cake adds structure and a subtle buttery flavor that complements the sweetness. 🎂
Nutrition facts
Frequently asked questions
Can I make this dessert without cake crumbs?
Swap the cake crumbs for ½ cup crushed vanilla wafers or graham crackers for a different texture. You can also use toasted coconut flakes for a tropical version or omit them entirely if you prefer a smoother texture. The crunch is optional but adds that classic nostalgic bite.
How do I fix runny gelatin layers?
If your gelatin turns out too soft, it likely didn't chill long enough. For immediate fixes, place the dish back in the fridge for 2-3 more hours. If that doesn't work, try this trick: Mix 1 tablespoon unflavored gelatin with 2 tablespoons cold water, let it bloom for 5 minutes, then stir it into the runny layer. Chill again until firm. Always remember—4+ hours of chilling is key!
Can I use store-bought whipped cream instead of homemade?
Yes! Store-bought vanilla whipped topping works perfectly—just make sure it's fully chilled before mixing. For best results, fold it gently with the whipped cream layer to maintain that light, airy texture. If using cans, check for any added stabilizers that might make the texture too dense. The convenience is worth it for busy days!
What's the best way to serve this dessert?
Serve chilled in individual portions with a spoon for easy scooping. For a special touch, invert onto a platter and garnish with chopped cherries, pecans, or berries. It's perfect for potlucks, picnics, or family gatherings—just bring a knife to slice clean portions. Leftovers keep well for 3-4 days in the fridge.
Is there a vegan version of this recipe?
Yes! Replace the gelatin with 1½ teaspoons agar-agar powder (bloomed in cold water) and use coconut milk whipped cream. Add ½ cup vegan vanilla pudding** to replace the whipped topping layer. The texture will be firmer but still delicious. Garnish with fresh fruit for color.