
Side Dishes
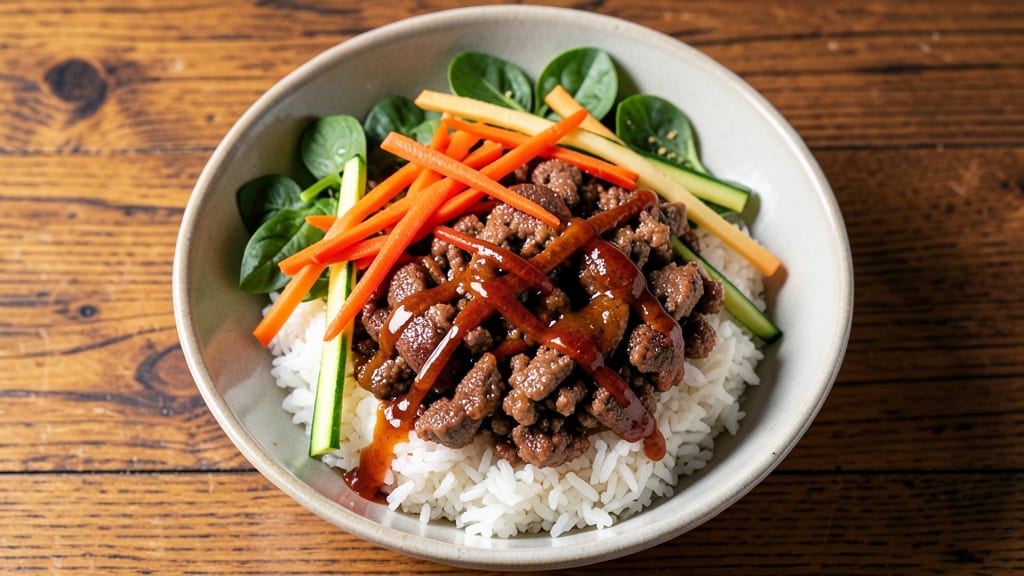
This bibimbap salad recipe brings the vibrant flavors of Korea to your dinner table with crispy vegetables, savory protein, and a bold gochujang sauce. 🔥 The beauty of bibimbap lies in its customizable nature—whether you prefer beef, tofu, or shrimp, every bowl becomes a colorful, flavorful masterpiece.
I’ve perfected this recipe to balance textures and flavors, ensuring each bite is packed with freshness and depth.
The foundation of great bibimbap starts with perfectly cooked rice and an array of crispy vegetables—carrots, spinach, and zucchini—each sautéed to retain their vibrant colors and textures. The gochujang sauce ties everything together, adding a spicy, tangy kick that elevates every component.
This recipe is designed to be both authentic and adaptable, so you can tailor it to your taste preferences.
What makes this dish truly special is the way the ingredients come together—warm rice, tender protein, and fresh vegetables all layered in harmony. The final touch of a fried egg adds richness and a satisfying contrast.
Whether you're serving it as a side or a main dish, this bibimbap salad is sure to impress with its bold flavors and beautiful presentation.
Ready to assemble your bowl? Let’s get started with the step-by-step instructions to create a restaurant-quality bibimbap right in your kitchen. The process is straightforward, and the results are worth every minute of effort.
Ingredients for bibimbap salad
Perfectly balanced ingredients for a vibrant, restaurant-style bibimbap salad with crispy textures and bold flavors.
| Ingredient | Amount | Notes |
|---|---|---|
| Short-Grain White Rice 🍚 | 2 cups | Uncooked, jasmine or sushi rice preferred |
| Ground Beef (80/20) 🥩 | ¾ lb | Lean-to-fat ratio for juiciness |
| Carrots 🥕 | 2 medium | Julienned into thin matchsticks |
| Zucchini 🥒 | 2 medium | Thinly sliced into half-moons |
| Baby Spinach 🌱 | 4 cups | Packed, lightly wilted |
| Gochujang Sauce 🌶️ | ½ cup | Korean fermented chili paste |
| Sesame Oil 🫒 | 1 tbsp | Toasted for nutty aroma |
| Vegetable Oil 🫒 | ¼ cup | For high-heat sautéing |
| Large Eggs 🥚 | 4 whole | Fresh for best texture |
| Sesame Seeds 🌾 | 1 tbsp | Toasted for garnish |
| Garlic Cloves 🧄 | 4 cloves | Minced for aromatic base |
| Soy Sauce 🥢 | 2 tbsp | For umami depth |
| Sesame Seeds (extra) 🌾 | 1 tbsp | For final garnish |
| Salt 🧂 | 1 tsp | Kosher or sea salt |
| Black Pepper 🌶️ | ½ tsp | Freshly ground |
The rice is the heart of bibimbap, so jasmine or sushi rice is ideal—sticky enough to hold the bowl together but light enough to let flavors shine. For the beef, 80/20 ground chuck gives you that perfect balance of lean and fat for juicy, flavorful bites. Most grocery stores carry it near the ground beef section, but Costco has it pre-packaged in bulk if you're making multiple servings. Look for bright red color and visible fat marbling—this ensures tenderness. The vegetables should be fresh and crisp; organic carrots and zucchini from the produce section work best for that vibrant color.
No gochujang? Mix 2 tbsp sriracha with 1 tbsp soy sauce and 1 tbsp honey for a quick substitute, though it won’t be as complex. For the spinach, baby spinach is ideal, but regular spinach chopped finely will work—just be sure to wilt it just until tender, not mushy. Sesame oil can be swapped for toasted peanut oil if you're avoiding sesame allergies, but the nutty aroma is what makes bibimbap special. The eggs should be fresh—room temperature for easier flipping. If you're short on time, pre-shredded cheese can replace the sesame seeds for a cheesy twist, though it won’t be traditional.
Rice keeps best in an airtight container in the fridge for 3-4 days, though it reheats beautifully. The cooked beef and vegetables stay fresh for 2 days if stored separately. For meal prep, cook the rice and protein ahead, then assemble bowls fresh—this keeps everything crisp. The gochujang sauce can be made a week ahead and stored in the fridge. Toast your sesame seeds in a dry pan for 30 seconds—they’ll add that perfect crunchy finish. Portion the sauce separately to control spice levels per bowl.
Why You'll Love This Recipe
- One-Pan Magic: I swear by this for nights when I’d rather scroll than scrub—just toss everything on a sheet pan, roast until caramelized, and call it a win. The beef stays juicy, the veggies get that perfect char, and the rice? Still fluffy. Minimal cleanup, maximum flavor.
- Umami Bomb: That 80/20 ground beef is the star—savory, slightly fatty, and packed with depth. I’ll be real: I often skip the sauce and just eat it straight with the spinach and zucchini, because the combo of tender beef, crisp-tender carrots, and that fresh spinach? It’s dangerously addictive.
- Lunchbox Hero: Between us, this is my go-to for meal prep—portion the rice and toppings into containers, and you’ve got a satisfying lunch for days. My kids actually finish theirs (yes, even the spinach), and it reheats like a dream. Pack it cold or warm, no complaints.
- Budget Flex: Short-grain rice is cheap, ground beef stretches far, and seasonal veggies keep it affordable. Honestly, I’ve made this for under $8 per serving, and it still feels like a restaurant dish. Plus, leftovers? They’re just better the next day—if they last that long.
Step-by-step instructions for Korean-inspired rice bowls
Here's how to build vibrant, crispy-veggie bibimbap with restaurant-quality texture.
🍳 Step 1: Cook the Short-Grain White Rice to Perfect Texture
Rinse the 2 cups short-grain white rice under cold water until the water runs clear—this removes excess starch for fluffy grains. Combine with 2 cups water in a pot and bring to a boil over high heat. Once boiling, reduce to low heat, cover tightly, and simmer for 15 minutes without lifting the lid.
After 15 minutes, turn off the heat and let the rice steam undisturbed for another 10 minutes. The residual heat will finish cooking the rice evenly. Fluff gently with a fork before transferring to a serving dish—you want grains that are tender but still hold their shape, with a slight stickiness that's perfect for absorbing flavors.
🔥 Step 2: Sauté the Vegetables for Maximum Crisp-Tender Perfection
Heat 1 tablespoon sesame oil and 2 tablespoons vegetable oil in a large skillet over medium-high heat. Add the julienned 2 medium carrots and cook for 3-4 minutes until they develop a golden caramelization—this is where the real flavor happens. Remove and set aside.
In the same pan, add the thinly sliced 2 medium zucchini and cook for 2-3 minutes until just tender with slight browning. Add the 4 cups baby spinach and stir until wilted but still vibrant green. Season each vegetable component with ½ teaspoon salt and ¼ teaspoon black pepper—this keeps flavors balanced while highlighting each ingredient's natural taste.
🍳 Step 3: Cook the Ground Beef with Aromatic Garlic
In a separate skillet, heat 2 tablespoons vegetable oil over medium heat. Add the 0.75 lb ground beef (80/20) and cook, breaking it apart with a wooden spoon, until it loses its raw color (3-4 minutes). Add the 4 minced garlic cloves and cook for another 30 seconds until fragrant.
Pour in the 2 tablespoons soy sauce and cook for 1 minute until the beef is fully cooked through but still juicy. Season with ½ teaspoon salt and ¼ teaspoon black pepper. The fat content in the 80/20 blend keeps the beef moist while adding rich flavor—don't drain it, as that rendered fat is pure taste.
🥘 Step 4: Prepare the Gochujang Sauce and Assemble
In a small bowl, whisk together the 0.5 cup gochujang sauce with 1 tablespoon sesame oil until smooth. This vibrant sauce will tie all your components together with its signature Korean heat and depth. Keep it warm until ready to use.
Divide the cooked rice evenly among serving bowls. Arrange the sautéed vegetables, ground beef, and any remaining components in colorful sections around each bowl. Drizzle with the gochujang sauce and finish with 1 tablespoon sesame seeds for nutty crunch and visual appeal.
🍳 Step 5: Cook and Garnish the Perfect Runny Eggs
Heat a non-stick skillet over medium-low heat. Crack each of the 4 large eggs into the pan, spacing them evenly. Cook for 2-3 minutes until the whites are set but yolks remain completely runny—this is the signature bibimbap egg texture. Transfer to plates and immediately garnish with the 1 tablespoon extra sesame seeds.
Serve the eggs directly on top of each rice bowl, letting the rich yolk mix with the other components when eaten. The contrast of crisp vegetables, tender beef, and silky egg makes every bite exciting. For extra drama, place a small bowl of gochujang sauce on the table to let everyone customize their heat level.
Pro Tips For Making Bibimbap Salad
- Preheat the pan for beef: I learned this the hard way—cold pans make greasy ground beef. Heat your skillet over medium-high until a water droplet sizzles immediately, then cook the 80/20 beef in one batch without stirring for 30 seconds. This gets that perfect crust before breaking it up.
- Slice carrots lengthwise: Thin, even strips cook faster and soak up sauce better than cubes. Use a mandoline for consistency, but if you’re doing it by hand, cut them ⅛-inch thick—any thicker and they’ll turn mushy while the zucchini stays undercooked.
- Don’t overcrowd the spinach: Toss baby spinach in just enough oil to coat lightly, then wilt it in batches. Crowding steams the leaves instead of crisping them, and you’ll end up with sad, limp greens in your bibimbap. A single layer in the pan works best.
- Use day-old rice: Fresh rice is too sticky and clumps when mixed. Cook your short-grain rice the day before, refrigerate it, then reheat with a splash of water over low heat until just warm. It’ll be light and separate—exactly what you want for that perfect bibimbap texture.
Serving suggestions for this bibimbap salad
Plating Like a Pro
Arrange your bibimbap in a colorful spiral pattern starting with the rice in the center. Use the sautéed vegetables, beef, and any additional toppings like mushrooms or bean sprouts to create a visually stunning contrast.
I like to use a wooden spoon to gently press the rice slightly into the bowl, creating a well for the egg. This makes serving and eating much easier while keeping everything contained. 🌈
Garnish for Extra Flavor
Finish your bibimbap with toasted sesame seeds and a drizzle of extra sesame oil for that authentic Korean touch. For added depth, sprinkle freshly chopped scallions or cilantro on top.
If you want to get fancy, add a few crispy fried shallots for a sweet, crunchy contrast. These garnishes not only enhance flavor but also make your dish look restaurant-worthy.
Serving with Korean Sides
Pair your bibimbap with traditional Korean side dishes like kimchi for tangy crunch or pickled radish (danmuji) for a refreshing contrast. A small bowl of steamed greens (sigeumchi namul) adds freshness, while soy-marinated spinach (sigeumchi kongnamul) brings umami depth.
These sides complement the rich flavors of bibimbap beautifully and make for a complete meal. 🍽️
Customizing for Dietary Needs
For a vegetarian version, swap the beef for extra-firm tofu marinated in soy sauce and sesame oil, then pan-fried until crispy. If you’re keeping it vegan, use mushrooms or tempeh instead.
For those avoiding gluten, ensure your gochujang is gluten-free or make a substitute with chili flakes and tamari. Always keep the egg optional for vegan guests—just serve it on the side.
Meal Prep and Storage
Store cooked components separately in airtight containers in the fridge for up to 3 days. Reheat the rice and vegetables in a skillet with a splash of water to restore crispness. Keep the eggs fresh by cooking them just before serving.
For a quick assembly, pre-portion the rice and sauce in containers, then let everyone customize their bowls at mealtime. This keeps everything fresh and ready to eat. ⏰
Presentation Tips
Use wide, shallow bowls to showcase the vibrant layers of your bibimbap. A small ceramic or stoneware bowl adds an elegant touch. For extra flair, serve with chopsticks and a spoon—the spoon helps mix everything together while eating.
If you’re feeling creative, arrange the ingredients in a flower-like pattern for a stunning centerpiece that’s as beautiful as it is delicious. 💫
Nutrition facts
Frequently asked questions
Can I make bibimbap without gochujang sauce?
Yes! If you can't find gochujang, mix 2 tbsp sriracha, 1 tbsp soy sauce, and 1 tbsp honey for a quick substitute. For a more traditional flavor, blend 1 tbsp chili flakes with 1 tbsp miso paste and 1 tsp rice vinegar. The key is balancing sweet, spicy, and umami notes to complement the dish.
How do I keep the vegetables crispy when reheating?
Reheat vegetables in a dry skillet over medium-high heat for just 1-2 minutes—they should sizzle but not steam. Add a splash of water only if needed, then drain immediately. Store components separately in airtight containers to maintain texture. For meal prep, cook rice and protein ahead, but always sauté veggies fresh before assembling.
What's the best way to make bibimbap vegetarian?
Replace beef with extra-firm tofu marinated in 2 tbsp soy sauce + 1 tbsp sesame oil for 30 minutes, then pan-fry until crispy. Add shiitake mushrooms or tempeh for extra umami. Keep the egg optional—serve it on the side for non-vegan guests. The gochujang sauce remains the perfect binding element for all components.
Why does my bibimbap rice turn mushy?
Overcooking or stirring rice after turning off the heat causes mushiness. Use the 1:1 rice-to-water ratio and let it steam undisturbed for 10 minutes off heat. Fluff gently with a fork—never stir! For extra insurance, spread cooked rice on a tray to cool slightly before assembling bowls to prevent sogginess.
Can I prep bibimbap ahead of time?
Cook rice and protein components 1-2 days ahead and store separately in airtight containers. Reheat veggies in a skillet for 1-2 minutes to restore crispness. Keep the gochujang sauce fresh by making it the day of. Assemble bowls just before serving to maintain that restaurant-quality texture and presentation.